
Last updated on September 15, 2026
ProctorU provides remote proctoring services for online courses at MSU Denver. Once you create a quiz in Canvas, you can set it up for proctoring through ProctorU. When students take the exam, ProctorU will record them. This recording will then be reviewed by either AI or a live proctor, depending on the type of exam service selected, and flagged for any possible behaviors associated with cheating.
ProctorU recently updated its integration with Canvas, improving ease of navigation and configuration. This tutorial will cover some best practices regarding ProctorU and how to set up a ProctorU exam through Canvas.
For more ProctorU support resources, visit ProctorU’s page, A Remote Proctoring Guide for Higher Education Course Exams. Please note that the Test Taker video guides on this page are outdated.
Note: Students may incur a fee for late scheduling of exams when using Record+.
Best Practices
Adjust Quiz Settings to Work with ProctorU
For a Canvas quiz to work with ProctorU, it must meet the following qualifications:
- The quiz must have a Due Date, Available from Date, and an Until Date.
- The quiz must have a Time Limit / Duration.
- The Quiz must have an Access Code / Password.
- The quiz must be published.
- ProctorU does not monitor quiz publishing status, so this step will need to be completed manually.
For steps on how to create and edit Quizzes in Canvas, see our tutorial, Create and Edit New Quizzes or Create and Edit Classic Quizzes.
Considerations when Using ProctorU
While ProctorU can be a good option for fully online courses, it is recommended that you offer students another option for proctored exams, such as taking them through the testing center. See our spotlight, Proctor Online Assessments, for more information on the different options.
- Students will have to download ProctorU’s Guardian Browser onto their device, which restricts them from accessing other sites, windows, and tools on their computer during the exam.
- You are able to change the restriction settings to allow specific tools or website URLs if desired.
- Students must have a computer or laptop device. Mobile devices, such as phones or tablets, will not work with ProctorU.
- Online proctoring can create a more stressful test-taking environment and cause concern for students’ privacy.
- Students often run into technical difficulties when taking an exam through ProctorU.
ProctorU Support for Students
The steps for students to schedule and take an exam through ProctorU can be challenging to understand. They will need to use either Google Chrome or Mozilla Firefox, and download the Guardian Browser before beginning.
We recommend sharing the ProctorU Test Taker Support Page with your students before they schedule their exam sessions, as it contains many articles on how to use ProctorU and a way for them to contact live support if needed. It may also be helpful for you to familiarize yourself with some of the articles in case students come to you with any questions.
View our FAQ, How do students access exams with ProctorU, for step-by-step instructions you can copy and paste to provide for students.
For information about setting up student accommodations in ProctorU, see the Student Accommodations section under Security and Resources below.
Directions
[Length 14:02, CC Available]
Set Up a ProctorU Exam in Canvas
Configure Exam to be Proctored
- Log in to your Canvas Account.
- Select the Course you’d like to work in.
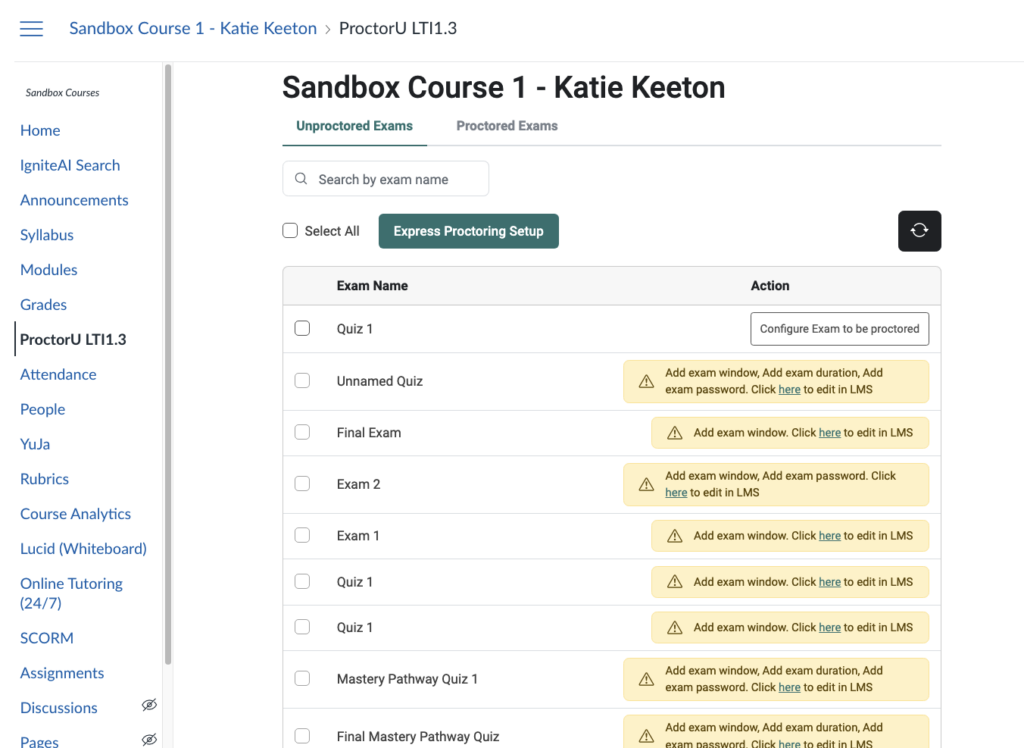
- Click ProctorU LTI1.3 in the left-hand course navigation menu.
- Note: If ProctorU is not in your course navigation menu, view our tutorial, Enable and Disable Items in the Course Navigation Menu, for steps on enable ProctorU in your course.
- Click Authorize from the pop-up window that appears.
- ProctorU may ask you to select the type of account you wish to continue with. Click Instructor Interface for the exam setup screen.
- Click Configure Exam to be proctored to the right of the quiz you want to connect to ProctorU. A pop-up window will appear with the configuration settings.
- Note: If your exam has a yellow alert next to it, that means that your exam is missing one or more qualifications to be configured through ProctorU. The alert will say what you need to fix in your quiz settings.
- Click the link inside the alert to be directed to the quiz to edit.
- See the section above for steps on how to edit your quiz settings to meet the qualifications.
- Note: If your exam has a yellow alert next to it, that means that your exam is missing one or more qualifications to be configured through ProctorU. The alert will say what you need to fix in your quiz settings.
- A pop-up window will appear with the configuration settings. See each section below for details on the configuration tabs, settings, and options.
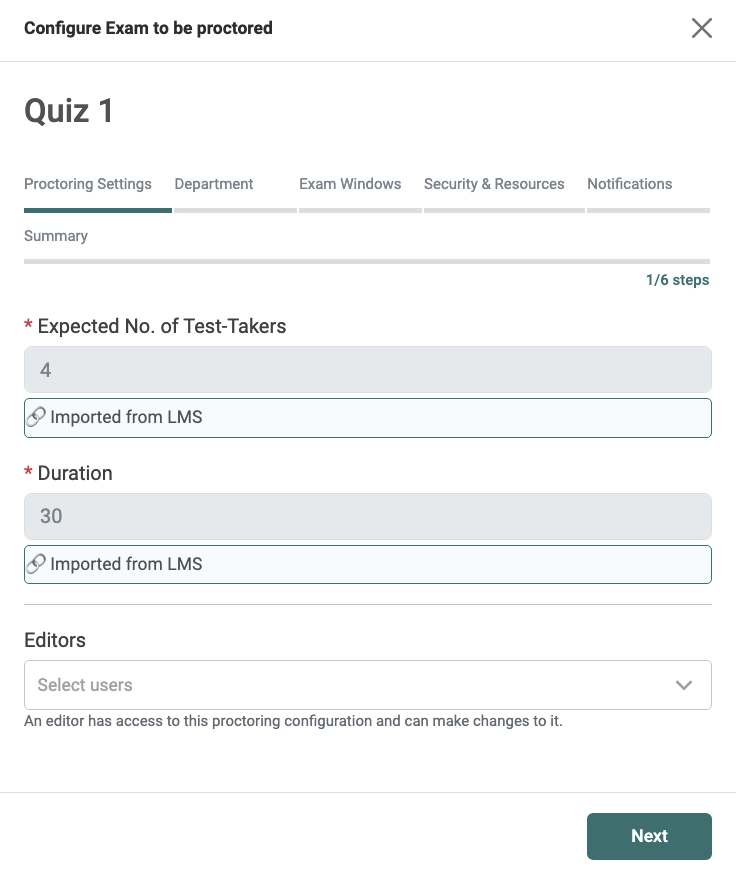
Proctoring Settings
- Leave the Expected No. of Test-Takers and the Duration fields as is. These are imported directly from your course and the Canvas Quiz.
- Optionally, Select an Editor. This is another instructor who can make changes to the proctoring configuration for the exam.
- Click Next.
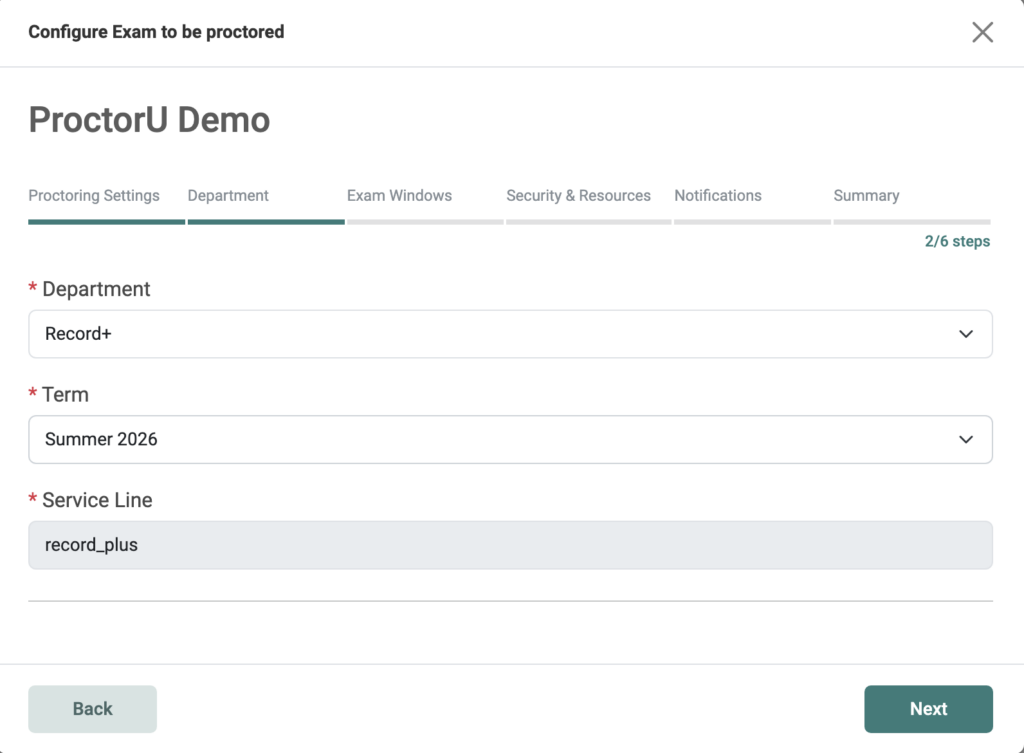
Department
- Select which department you want to use for the exam using the drop-down menu.
- Record+: This is the Free for Students option and does not include a live proctor. Instead, students will take a picture of their ID before the exam, and then ProctorU will record students while they are taking the exam. The recording is then reviewed afterward, and you will receive an email if there are any flagged potential cheating behaviors.
- Live+: This is the Student Pay option and includes a live proctor who monitors the webcam and screen sharing in real time as the student takes the exam.
- Note: The cost for students ranges from 15 – 30 dollars, depending on the duration of the exam.
- Select the Term the exam will take place in.
- Click Next.
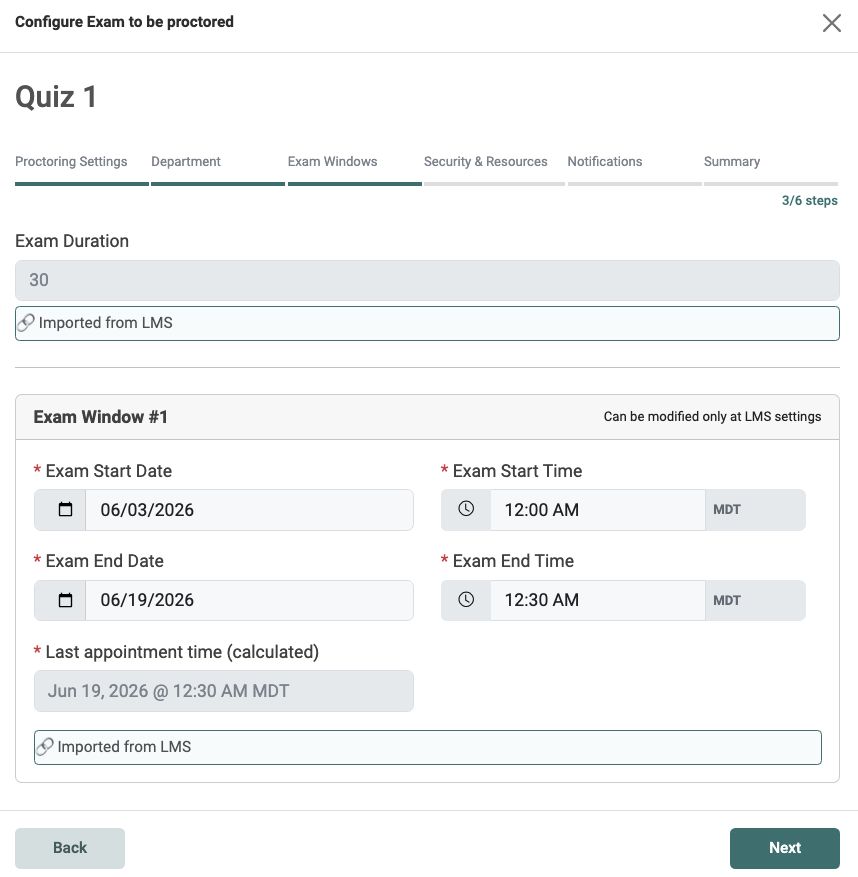
Exam Windows
- Check that the Exam Duration and the Exam Window look correct.
- You will need to make any necessary changes in the Canvas Quiz settings.
- Click Next.
Security & Resources
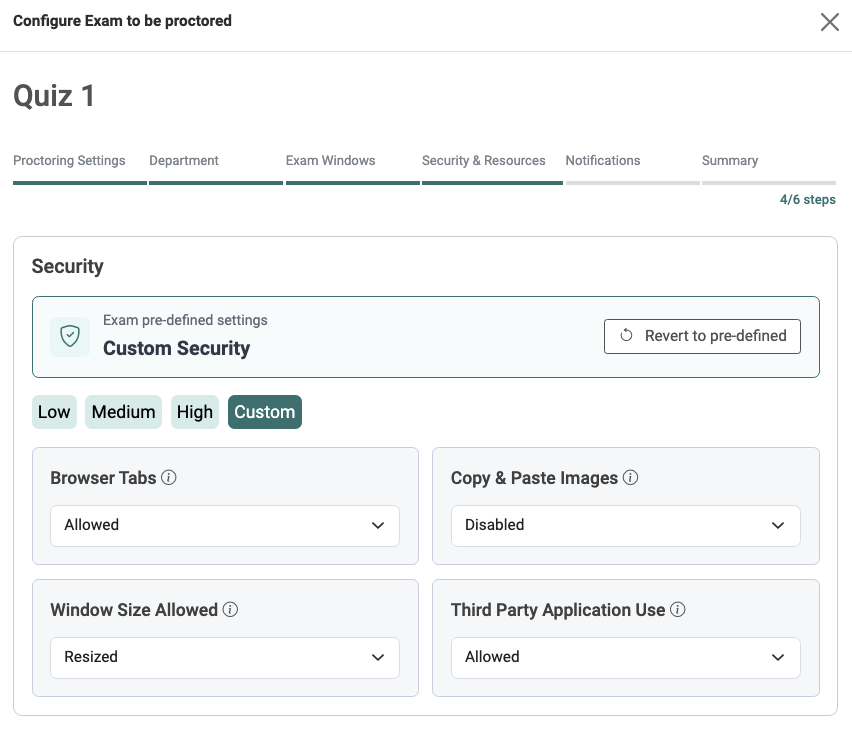
- Click Edit manually to change the Security settings.
- Select a Security Option (Low, Medium, High, or Custom).
- Low, Medium, and High have preconfigured security settings, which can be viewed when you select the option.
- Custom allows you to adjust each security setting individually.
- If Custom was selected, you may stick with the pre-defined selections, or select an option for each security setting.
- Browser Tabs: Controls if students can access all websites or only designated websites.
- Allowed: Students can access any website they want through the Guardian Browser while taking the exam.
- Restricted: Students can only access whitelisted websites while taking the exam (steps to set up whitelisted websites below)
- Copy & Paste Images: Records and controls copying activity during the assessment.
- Disabled: Prevents students from pasting content and using Print Screen and will record what students attempted to copy.
- Enabled: Allows copy and pasting, but will still record what the student copied.
- Window Size Allowed: Controls the Guardian Browser size while taking the exam.
- Full Screen: Exam occupies all available screen space and prevents students from viewing or accessing desktop items, the taskbar, the URL bar, browser tabs, or other applications.
- Maximized: Guardian browser covers the entire screen, preventing access to desktop items and other applications, but retains title bars and borders.
- Resized: Students can fully resize the Guardian browser and access other applications.
- If allowing software resources, such as Excel or Word, Resized must be selected.
- Third Party Application Use: Controls use of external programs and applications.
- Restricted: Prevents students from using outside applications.
- Allowed: Permits access to other programs and applications.
- Browser Tabs: Controls if students can access all websites or only designated websites.
- Select a Security Option (Low, Medium, High, or Custom).
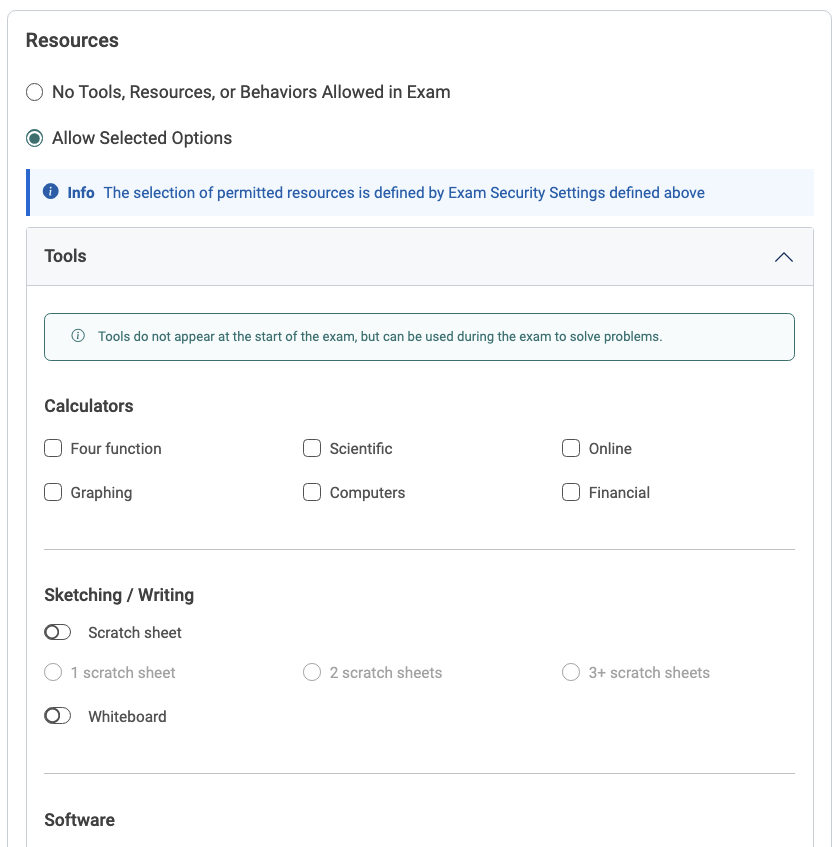
- Select Resource Allowance Option.
- No Tools, Resources, or Behaviors Allowed in Exam will make the settings so that students cannot use any tools or resources during the exam, including bathroom breaks.
- Allow Selected Options will open a menu of tools and resources. Select which tools and resources are allowed.
- Note: Depending on your Security Settings, some options will be greyed out, meaning you cannot select them.
- Tools: Select any calculators, sketching/writing, or software options that are allowed.
- Resources: Select which Web, Books, or Notes options are allowed.
- To add a whitelisted (allowed) website, enter the URL into the Add a custom URL field. Then, click Add Website.
- Behaviors: Click the Bathroom breaks toggle to allow students to take bathroom breaks during the exam.
- Other: Enter any custom resources that were not listed. Then, click Add Resource.
Student Accommodations
- Click the Open Accommodations Form in a New Tab link if you have any students with accommodations, such as text-to-speech.
- Note: You do not need to fill out the accommodation form for extra time or extra attempt accommodations. However, those accommodations will need to be set up in the Canvas Quiz settings.
- View our spotlight, Use Accommodation in Canvas, for guidance on how to set this up.
- View ProctorU’s page, Accessibility, Accommodations, and Process Exceptions, for more information about what accommodations are available.
- Note: You do not need to fill out the accommodation form for extra time or extra attempt accommodations. However, those accommodations will need to be set up in the Canvas Quiz settings.
- Enter the following information about the student/s in need of accommodations in the Details of your request section of the form.
- First and last name.
- MSU Denver email address (You can find this in the People section of Canvas).
- Accommodation information (ie, extra time, bathroom breaks, permitted use of a screen reader, a person in the room for extra assistance, etc.).
- The name of the exam(s) that the accommodations will cover.
- If accommodations apply to multiple exams from the same instructor, only one request will be needed stating that the accommodations will cover all of your exams for that particular class.
- Click Next.
Notifications
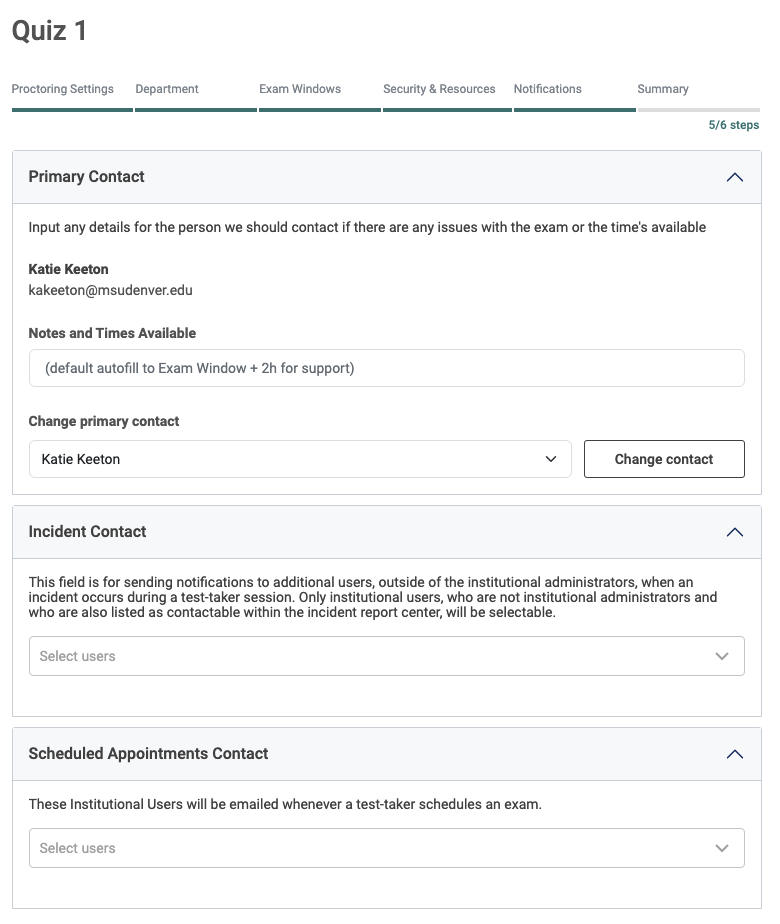
- Enter when or how you would like to be contacted in the Notes and Times Available field.
- If this is left blank, the time available will default to during the Exam Window +2 hours.
- Optionally, select an instructor from the Change primary contact field if you want an instructor other than yourself to be the main contact for any issues.
- Type your Full Name in the Incident Contact field, and select your name when it appears from the list of options.
- This setting is required to receive emails from ProctorU about any incident reports for flagged behaviors during the exam.
- Optionally, type your Full Name in the Scheduled Appointments Contact field to be notified when a test-taker schedules an exam. Select your name when it appears from the list of options.
- For Record+ exams, students do not schedule the exam, so you do not need to fill this field out.
- Click Next.
- Verify all the settings look correct.
- Click Save Configurations.
Note: You will receive a confirmation email from ProctorU after configuring your exam. The Review Exam Information link will take you to ProctorU’s website. If your exam is Record+, the webpage will have a warning stating “Sorry, but that iteration does not exist”. This is because Record+ exams can only be accessed from the Canvas integration. Your exam is still active, and students will be able to access it from your Canvas course.
Use Express Proctoring Setup
Express Proctoring Setup allows you to configure one or multiple exams at once using settings from another exam. This can speed up the process if you have multiple ProctorU exams in a semester, or if your department has standardized rules.
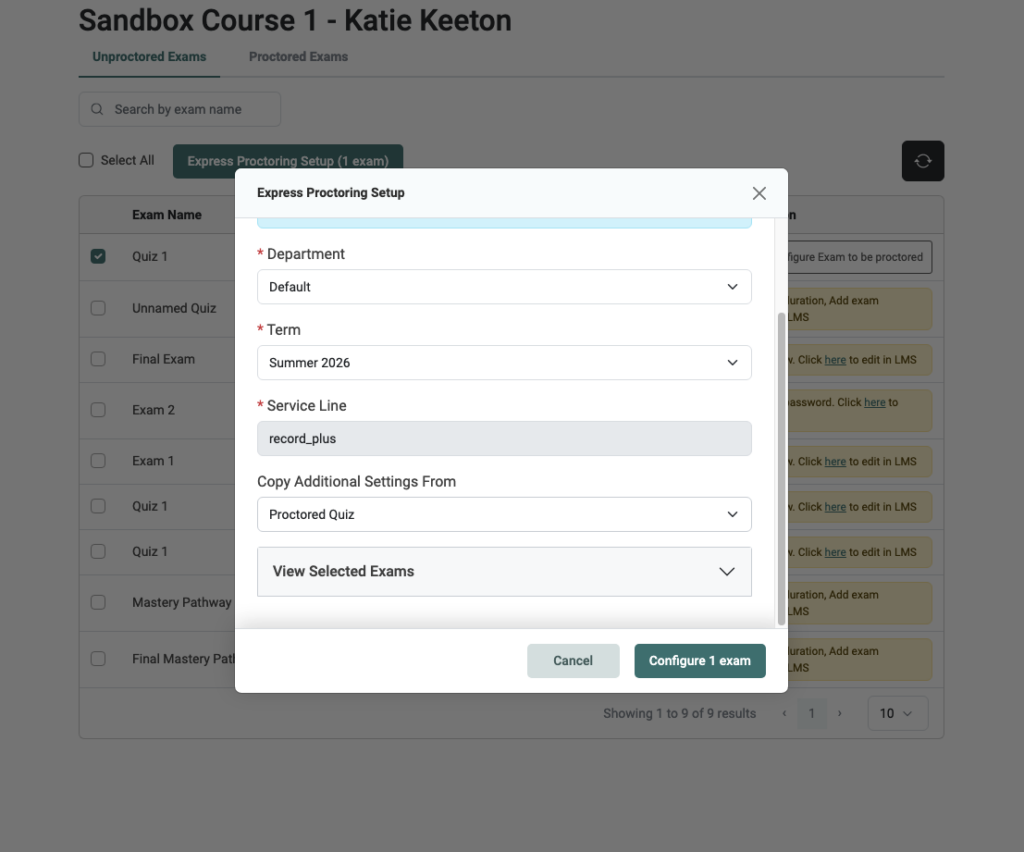
- Check the box to the left of each Exam Name you want to configure with ProctorU.
- Note: If your exam has a yellow alert next to it, that means that your exam is missing a qualification to be configured through ProctorU. The alert will indicate what you need to fix in your quiz settings.
- Click the link inside the alert to be directed to the Canvas quiz to edit.
- See the section above for steps on how to edit your quiz settings to meet the qualifications.
- Note: If your exam has a yellow alert next to it, that means that your exam is missing a qualification to be configured through ProctorU. The alert will indicate what you need to fix in your quiz settings.
- Select which department you want to use for the exam/s using the drop-down menu.
- See the Department section above for more details on the different options.
- Select the Term the exam/s will take place in.
- Click Copy Additional Settings from the drop-down menu.
- Select an Exam Name from the list of options.
- This will show any exams that are currently active through ProctorU, including exams from other instructors/courses.
- Click Configure [#] exam/s.
View and Edit Configured Exam
- Log in to your Canvas Account.
- Select the Course you’d like to work in.
- Click ProctorU from the left-hand course navigation menu.
- Click Authorize.
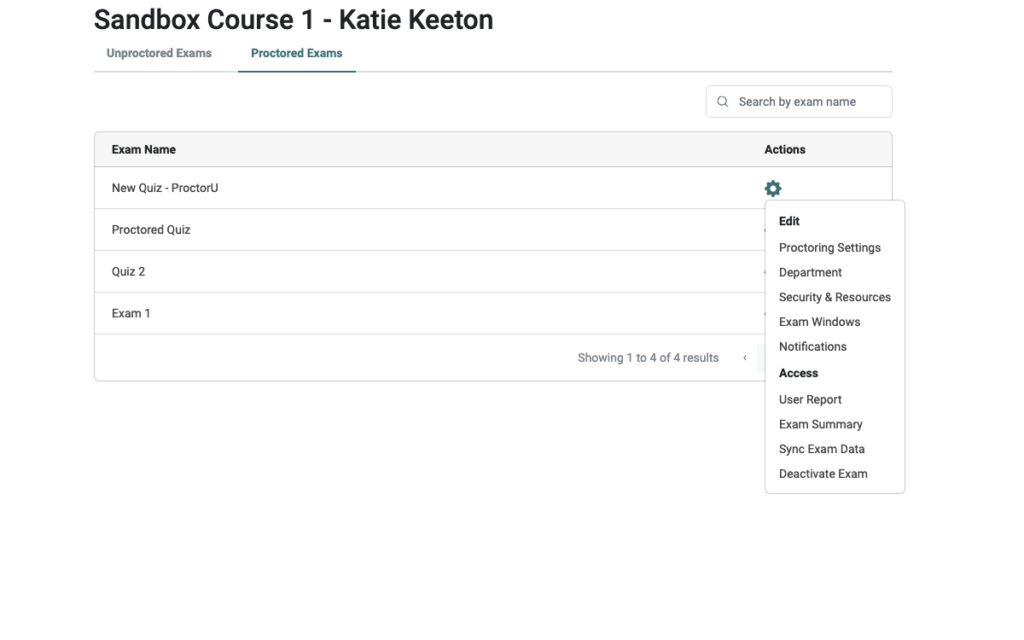
- Click Proctored Exams at the top of the window.
- Click the settings gear icon to the right of the Quiz.
- Select an option from the dropdown menu.
- Edit Options: Select one of these options to edit the configuration settings for the exam. See above for more detailed information about each option.
- User Report: View the exam status for each student in your course.
- Note: If your exam is a Record+ exam, the reservation link will not work. This is because students do not schedule exam sessions.
- For explanations of each status, view ProctorU’s support page, Session Statuses Explained.
- Exam Summary: View the configuration settings for your exam.
- Sync Exam Data: Sync any changes you made to the Canvas Quiz with ProctorU.
- Note: You can make changes to the Canvas Quiz or the ProctorU settings at any point before the exam window; however, ProctorU recommends not making any changes within 24 hours of the Exam’s start time to ensure all changes fully sync.
- Deactivate Exam: Remove the Exam from ProctorU.
- This will only remove the exam from ProctorU; the Canvas Quiz will still remain in your course.
Have questions?
Need additional support on this or other teaching and learning topics? Please visit us for drop-in support or try one of our self-help tutorials.
Ready to take your teaching to the next level? Opt into our Connections with CTLD newsletter!