Last updated on June 22, 2026
It’s now easier for instructors to create accessible video content by automatically generating captions for uploaded media files recorded directly in the Rich Content Editor (RCE). Using this new feature, faculty and students can request captions as part of the standard video creation process. This streamlined workflow allows both faculty and students to provide more inclusive learning experiences with less time and effort.
In addition to captions, Canvas also provides Interactive Rolling Transcripts that display and scroll alongside videos in real time. Students can search transcripts for keywords, jump directly to important moments in a lecture, and quickly review specific concepts or topics. These searchable transcripts support different learning preferences, improve comprehension, and make it easier for students to engage with and revisit course content.
Yuja still remains the recommended platform for creating video content for your courses. It offers more features, robust accessibility, easier organization for longevity, and larger storage limits, among other items. Review our Spotlight called Incorporate YuJa into Your Canvas Course to learn more.
If you need assistance in deciding which multimedia tool to use in your course, review our Spotlight on Multimedia Assignments.
Contents
Directions
Upload or Record a Video Using the Canvas Media Tool
Follow these steps to upload a pre-recorded video, or record your own using the Rich Content Editor (RCE). These instructions are the same for any type of page in Canvas that uses the Rich Content Editor.
- Log in to your Canvas Account.
- Select the course you’d like to work in.
- Click Modules on the course navigation menu on the left.
- Click the name of the page where you would like to add your video.
- If you need help creating a page, see our tutorial Create and Edit a Canvas Page.
- Click the Edit button at the top right.
- Click the Record/Upload Media (play icon with music note) button in the toolbar above the Rich Content Editor (RCE).
- To upload a video from your computer, follow these instructions:
- Click on Upload/Record Media.
- Click on the Computer tab.
- Click the link titled click to browse your computer.
- Select a pre-created video file from your computer.
- Note: Canvas supports a wide array of media formats, including .mp4, .mov, mpg, and more.
- Click Open to upload the video file.
- Alternatively, drag and drop a video file directly onto the dialog box.
- Optionally, click the check box to Add CC/Subtitles to upload your own transcript file to the video.
- Click to select the language of your subtitles and choose the caption file.
- Note: If you don’t have a premade transcript/caption file, don’t select this option. Canvas will allow you to automatically add captions after the file has been uploaded.
- Click Submit
- To record a new video, follow these instructions:
- Click on the Record tab at the top of the pop-up window to record a new video.
- Click on the Video Recorder icon at the bottom of the video preview screen to select the camera you want to use to record your video.
- Click on the Microphone Icon at the bottom of the video preview screen to select the microphone you want to use to record your audio.
- Click the Start Recording button at the bottom right.
- You will get a countdown from 3 to get ready to record.
- Click Pause to pause recording and continue.
- Click Finish when you’re done recording.
- Preview your recording if necessary.
- Click the Start Over button if you’d like to redo your recording.
- Type a name for the video in the File name field.
- Click the blue Save Media button at the bottom right when you’re finished.
Request Captions
- Click the video, and the Video Options button should appear.
- Click the Video Options button.
- Optionally, click in the Title field to change the name of your video.
- Click the bubble next to Embed Video or Display Text Link (Opens in a new tab) to choose if your video displays in the page or if you want it to be a link that opens in a new window.
- Click on the Player Layout drop-down box to choose the player size.
- Available sizes are small, medium, large, extra-large, and custom. Custom will allow you to choose your own size by entering width and height.
- Note: A video must be extra large or above 720 pixels to display the transcript panel next to it when embedded
- Click on the Show Rolling Transcript toggle under Viewer Restrictions to disable the transcript panel. If Show Rolling Transcript is turned off, it will not be available to students at all, both in the normal view and the expanded view.
- Note: Transcript availability does not affect normal Closed Captions.
- Click the blue Request button under Caption Manager to request auto-captioning.
- Choose the language from the Language Spoken in This Media* drop-down.
- Click the blue Request button.
- The prompt will change to Processing…
- Click the blue Done button at the bottom right.
- Depending on the length of your video, captions usually take between 10-60 minutes to process, but can take up to 24 hours. You can continue other work and check back on caption processing at your leisure. Continue with the next steps once your video is done processing and the captions are ready.
- Click the blue Save button at the lower right to save your page.
- Return to the Video Options screen when your captions have finished processing.
- You should see English (Automatic) underneath the Caption Manager heading.
- Note: To the right of the caption heading is a download icon to download the caption file and a trashcan icon if you want to delete the captions.
- Click the blue Done button on the lower right to close the Video Options screen.
- Click the blue Save button on the lower right of the assignment screen to save your assignment settings.
Review and Edit Transcript
After your captions have finished processing, you’ll need to review them for accuracy and edit any misunderstood words or terms in your video. You can edit the captions in Extra Large or full screen mode.
Edit Captions in Extra Large Mode
- Click the Edit button at the top right of the page.
- Note: In order to edit the transcript, the video will need to be in the Extra Large format, or sized larger than 720 px. Otherwise, you’ll need to enter full screen mode to edit the captions (see steps below for guidance).
- Click the video and choose Video Options.
- Choose the Extra Large (850 x 357 px) option from the Player Layout drop-down menu.
- Click Done.
- Click the vertical ellipsis (3 vertical dots) at the top right of the transcript.
- Click Edit Transcript.
- Click Play to play the video.
- Review the transcript.
- Pause the video when you notice misspellings, misread terms, etc.
- Click in the text cell directly on the transcript, and edit the sentence so it matches the dialog.
- Click Save at the bottom right of the page when finished editing.
Edit Captions in Small, Medium, or Large Mode
- Click the Edit button at the top right of the page.
- Click the angled double arrow at the bottom right of the video player to enter full-screen mode.
- Click on the vertical ellipsis (three dots) at the top right by the search bar.
- Click Edit Transcript
- Click Play to play the video.
- Review the transcript.
- Pause the video when you notice misspellings, misread terms, etc.
- Click in the text cell directly in the transcript, and edit the sentence so it matches the dialog.
- Click the X next to Edit Transcript at the top right when finished editing.
- Click the angled double arrow again to return the screen to its normal size.
- Click Save at the bottom right of the page when finished editing.
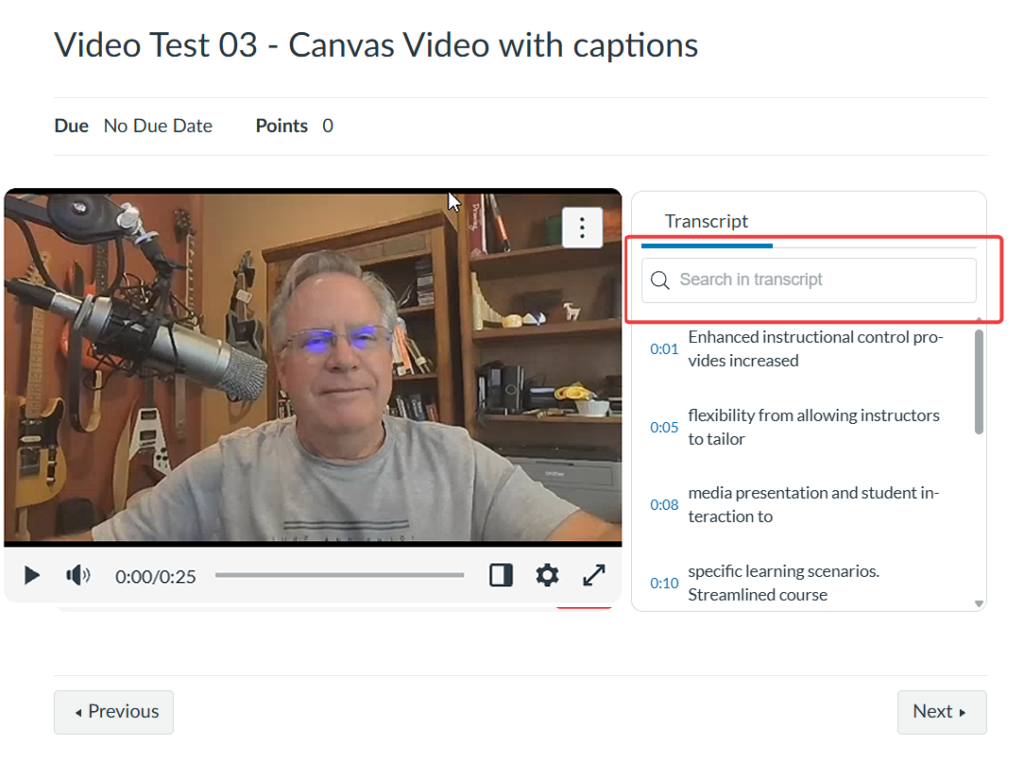
Student View of Transcript
Students can view transcripts directly alongside the video when it’s configured in any size larger than 720 pixels, which are the Extra Large or Custom sizes. For all other video sizes, the transcript is still easily accessible by expanding the video player. They can use the transcripts to search for key concepts and instantly jump to those moments in the video. Clicking any line in the transcript takes them directly to that point, making it easy to review specific areas of the presentation.
- Click the Search in transcript field and enter a search term to scan the transcript.
- Click the angled double headed arrow at the bottom of the player to expand the player to show the caption manager transcript in full screen.
- Click the angled double arrow to collapse the screen back to normal size then you’re done.
Have Questions?
Need additional support on this or other teaching and learning topics? Please visit us for drop-in support (10am-3pm, M-F) or try one of our self-help tutorials.
Ready to take your teaching to the next level? Opt into our Connections with CTLD newsletter!