
Last updated on September 23, 2026
Grading student work can be one of the most challenging and time-consuming parts of teaching a course. You need to check students’ work for accuracy, for meeting requirements, and for understanding of the learning objectives for a multitude of assignments. On top of that, it’s important to provide students with meaningful and timely feedback regarding why they received the score they did and how they can improve for the future. Rubrics can help with this process by providing a clearly defined set of criteria that forms the basis for assessing student work and providing feedback. While it may take some extra time up front to create them, rubrics can decrease the overall amount of time you spend grading and clarify expectations for students.
The Enhanced Rubric tool in Canvas (April 2026) updated Canvas Rubrics to have a more intuitive interface for creating rubrics, drafting criteria, and adjusting rubric settings. This spotlight will go over some best practices for using Enhanced Rubrics, including example rubrics, as well as how to create a rubric, attach a rubric to an assignment or discussion, grade with a rubric, and how to view/organize your rubrics.
Best Practices
What is New about Enhanced Rubrics?
- The drag-and-drop feature allows you to reorder criteria in your rubric easily.
- You now have the ability to import and export rubrics using CSV files.
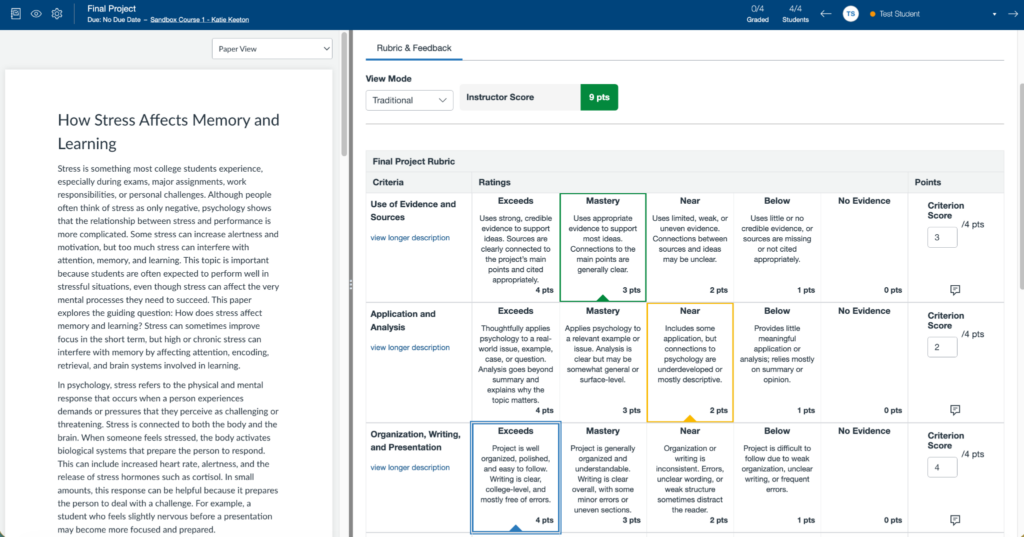
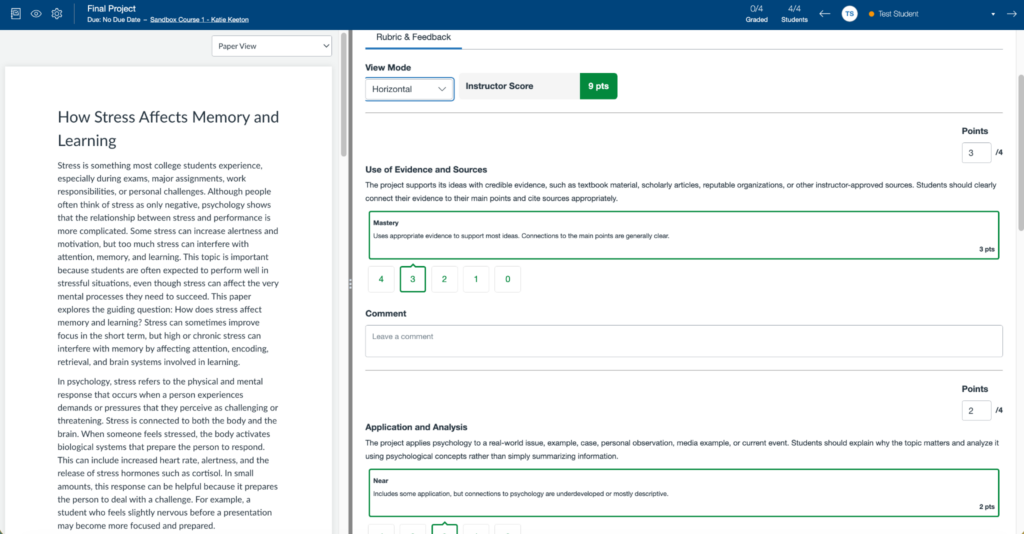
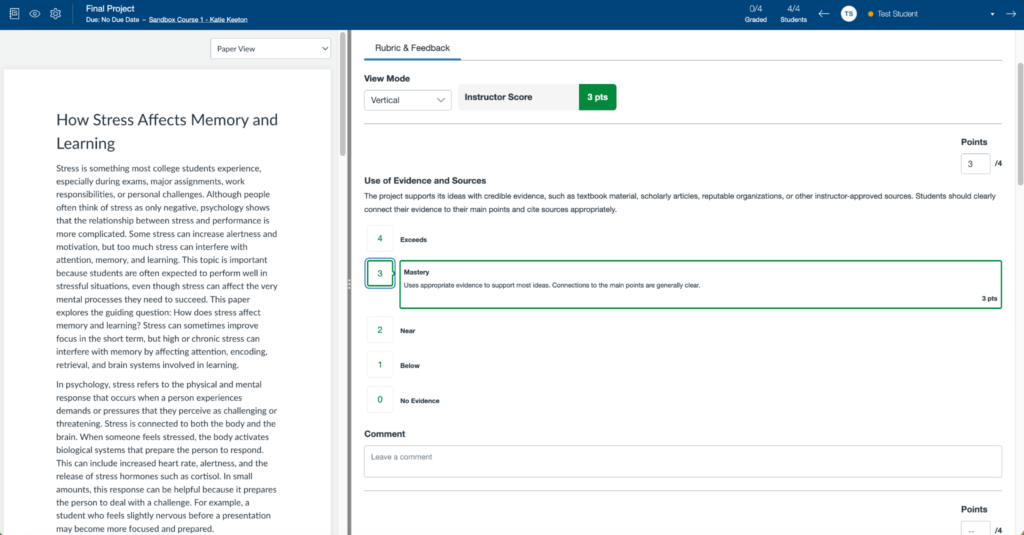
- There are more flexible display modes in SpeedGrader, allowing users to switch between traditional, horizontal, and vertical views.
- Students can use rubrics to self-assess their work.
- You can easily see which courses and assignments are using a particular rubric.
- Save rubrics as a draft before publishing and archive unused/old rubrics without having to delete them entirely.
What are the Benefits to Using Rubrics?
- Rubric-based grading helps keep grading consistent and eliminates potential biases by ensuring student work is evaluated against the same criteria.
- Students can use rubrics as a guide to evaluate their own work based on outlined expectations before submitting it.
- Rubrics with criteria that have clearly defined requirements and expectations provide instant feedback on why a student received a specific score, allowing instructors to spend less time writing repetitive comments.
- Rubrics allow for better and more transparent alignment between learning objectives and assessments.
When Should I Use Rubrics?
- To clarify assignment-specific expectations, such as students’ technical writing skills, the structure of their paper, or the number of required citations.
- In Discussions where students are expected to meet certain requirements, such as the number of replies, to earn full credit.
- To measure student achievement of learning objectives in your course.
- In projects, assignments, or assessments that measure multiple learning objectives or have several requirements to keep track of.
- Attach the same rubric to multiple assignments/discussions to keep expectations consistent across your course.
How Do I Write an Effective Rubric?
Performance Criteria
- Include three or more performance criteria that are aligned to Course Learning Objectives (CLOs) and Module Learning Objectives (MLOs)
- See our spotlight, How to Start Building Your Course Part 2, for more information on writing learning objectives for your course.
- Criterion names are student-friendly, concise, and reflective of the skill or concept the criterion is measuring.
- Criterion descriptions require students to demonstrate a specific skill in a measurable, observable way.
Criteria Rating Levels
- Include 3-6 rating levels for each criterion.
- Avoid a “catch-all” middle category by creating enough rating levels to easily distinguish between levels.
- You can differentiate the number of rating levels by criteria when using Enhanced Rubrics.
- For example, one criterion might only require three levels (such as number of replies in a discussion), while another criterion might require five (such as understanding of a learning objective)
- You can differentiate the number of rating levels by criteria when using Enhanced Rubrics.
- Rating Names are used to indicate the level of performance without being overly negative.
- Ex: Exceeds, Mastery, Near, Below, No Evidence
- Ex: Advanced, Proficient, Developing, Beginning
Rating Level Descriptions
- Rating descriptions are specific, observable, and create meaningful differences in performance levels for a given criterion.
- Avoid vague or subjective language that can lead to unclear grading expectations.
- All rating descriptions evaluate the same skill or concept within a given criterion
Example Rubrics
Let’s walk through it together
[Length 17:10, CC Available]
Create a New Rubric
- Log in to your Canvas Account.
- Select the Course you’d like to work in.
- Click Rubrics on the course navigation menu to the left.
- You can also create rubrics through an Assignment by clicking into the assignment and following the same steps as below.
- Click + Create New Rubric at the top right of the screen.
- Optionally, Click Import Rubric to import a CSV file of a rubric.
- Note: You must use Canvas’s Template (found in the Import Rubric panel) for this to work. It is generally easier to create a rubric using the Enhanced Rubric tool than to import one.
- Optionally, Click Import Rubric to import a CSV file of a rubric.
- Type the Title of the rubric in the Rubric Name textbox.
- Select the type of rubric.
- Scale: This is the standard rubric style, where students score within a point range (ie. 1-4 points) for each criterion.
- Written Feedback: Criteria do not have a point range. Students will receive either all points or no points for each criterion.
- Select the Rating Display.
- Level: Level will show the numeric labels for each rating.
- Points: Points will show the actual point value for each rating. For example, if the levels are 1-4, but students earn 2 points for each level, the points would show the points they would receive.
- Select the Rating Order.
- Select whether the rubric will be scored or unscored.
- Note: If creating the rubric from an Assignment page, click the box next to Use this rubric for assignment grading if you would like student grades to be auto-populated with the Rubric score.
Add Criteria to Rubric
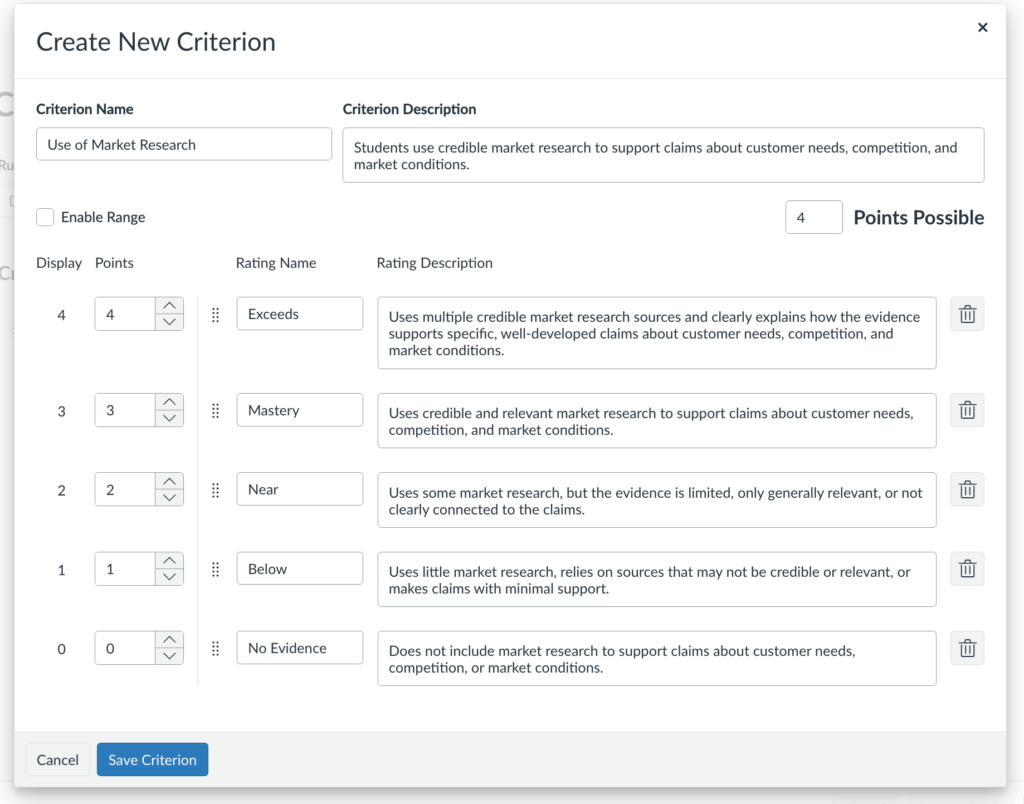
Draft New Criterion
- Click Draft New Criterion at the bottom left under the Criteria Builder.
- Type the Criterion Name in the top left textbox.
- Enter the Criterion Description in the top-right textbox.
- Select the box next to Enable Range if you want multiple point values to fall under each rating.
- For example, 5-6 points could be the range for Mastery rather than just 5 points.
- Edit the point value for each rating in the textbox next to the Display numbers.
- Note: The Total Points Possible in the top left below the Criterion Description will automatically update as you edit the point value for each rating.
- Edit the Rating Name (optional) for each rating in the textbox to the right of the Points.
- Enter a Rating Description for each rating in the text box to the right of the Rating Name.
- Click Save Criterion in the bottom left of the pop-up window.
- Repeat steps 1-8 for each criterion you wish to add to the rubric, or see below for how to create criteria from a learning outcome.
Create From Outcome
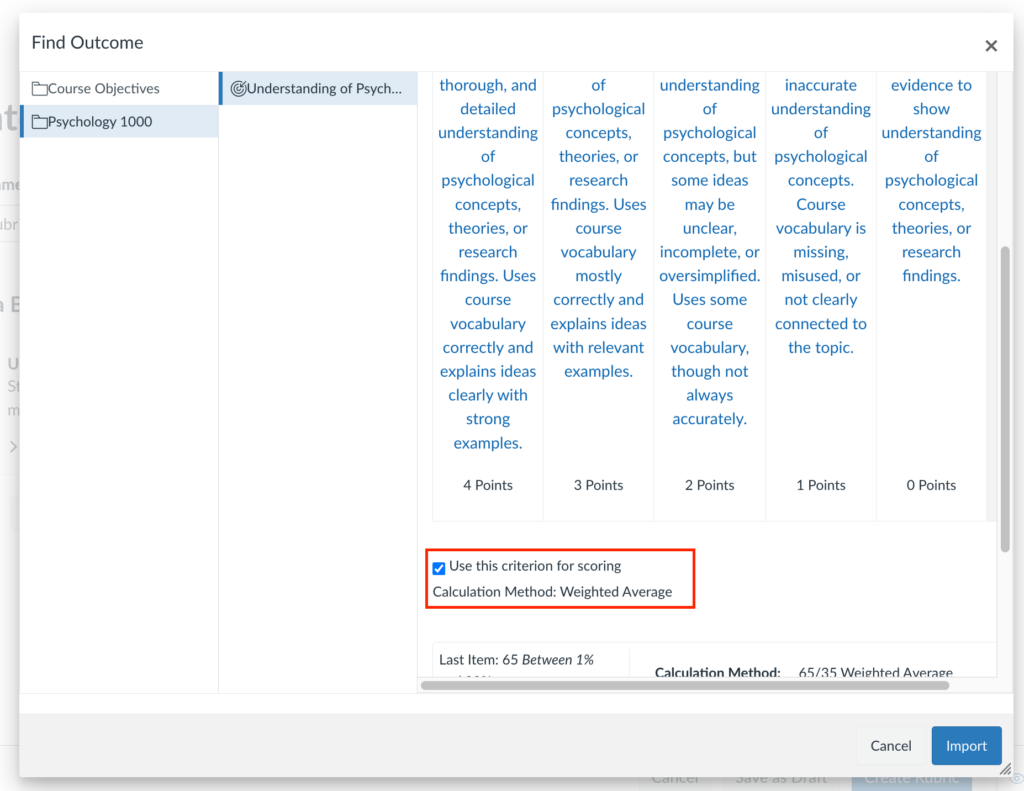
- Click Create From Outcome on the left side of the rubric editor under the Criteria.
- Search for the outcome using folders on the left of the pop-up window.
- For guidance on creating Learning Outcomes in Canvas, see our spotlight, Use Learning Outcomes to Measure Student Progress in Canvas.
- Click the outcome name to add it to the rubric.
- Check the box next to “Use this criterion for scoring” if you would like to have points attached to this criterion in the rubric.
- If you do not check this box, you will still score students using the outcome criteria, and you will still be able to track mastery, but it will not affect the student’s grade for the assignment.
- Click Import on the bottom right of the pop-up window.
- Note: You cannot edit criteria created from outcomes from within the Rubric editor.
- Refer to the Spotlight, Use Learning Outcomes to Measure Student Progress in Canvas, for directions on how to adjust the text and points that display in the rubric for the aligned outcome.
- Note: You cannot edit criteria created from outcomes from within the Rubric editor.
- Repeat steps 1-5 for any additional learning outcomes, or see above for how to draft new criteria.
Edit Criteria
- Click the Trashcan icon to delete a criterion.
- Click the pencil icon to edit a criterion.
- Click the three dots to the right of the criterion name, and select move up or move down to rearrange the criteria.
- Alternatively, click the eight-dot array to the left of the criterion name, and drag it to the location you want.
- Click the square icon with a plus to duplicate the criterion.
- Click Preview Rubric in the lower right corner to view the SpeedGrader view of the rubric.
- Click Create Rubric when done.
Attach a Rubric to an Assignment or Discussion
- Click Modules on the course navigation menu to the left.
- Scroll to the Assignment/Discussion within the Module you’d like to edit.
- Click the Name of the assignment.
- For discussions, click the three dots to the right of the discussion title and select Add Rubric from the drop-down menu.
- Note: Discussions must be set to graded for rubrics to be available. See our tutorial, Attach a Rubric to a Discussion, for more guidance.
- For discussions, click the three dots to the right of the discussion title and select Add Rubric from the drop-down menu.
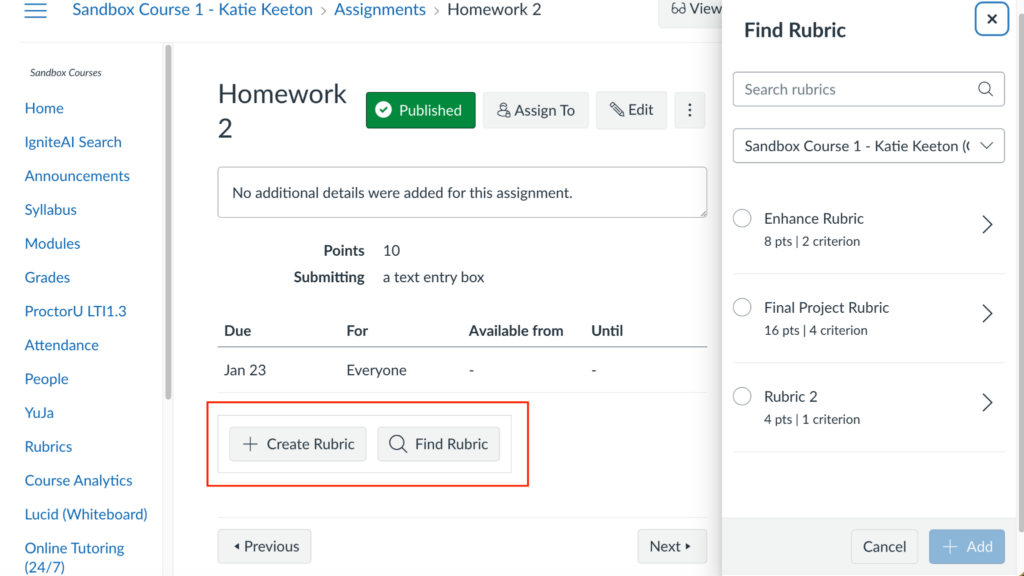
- Click the Find Rubric button.
- Click the appropriate Course from the drop-down menu at the top of the panel that appears.
- You can search for and add rubrics created in any course you are a teacher in. Once you add a rubric from another course to your assignment, it will automatically be added to the current course you are working in.
- Click the arrow next to the rubric title to view the rubric.
- Click the X at the top right to exit the rubric view.
- Click on the bubble to the left of the rubric title in the right panel to select the rubric.
- Click + Add at the bottom right of the panel to attach the rubric to the assignment.
- Click the box next to Enable self-assessment under the Rubric title at the bottom left of the screen to turn on the ability for students to score themselves based on the rubric.
- You will be able to view student’s self assessment through SpeedGrader when scoring their submission.
- Note: If this option does not appear, you will need to enable the Enhanced Assignments – Student feature in the course settings.
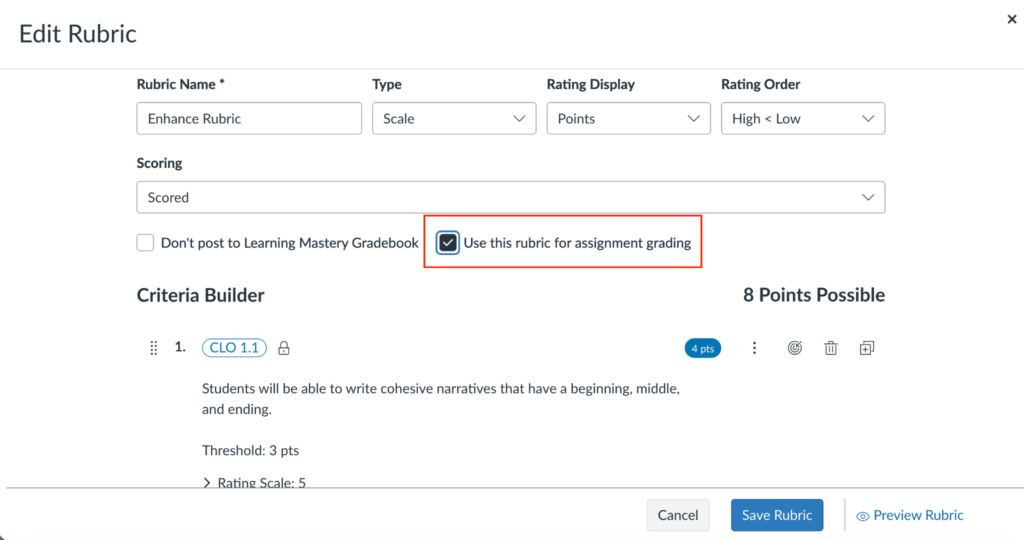
- If you would like the rubric to auto-populate grades, you will need to enable it in the Rubric Settings.
- Click the pencil icon to the right of the rubric title.
- Select the box next to Use this rubric for assignment grading.
- Click the blue Save Rubric button at the bottom right of the screen.
- Note: If the assignment points and rubric points are different from each other, a pop-up will appear warning that leaving the assignment’s points as is will result in a maximum possible score other than 100%. Click Change to adjust the assignment points to match the Rubric points.
Grade with a Rubric
Note: If you would like the grades to auto-sync with the rubric score, you will enable it in the Rubric settings. See the last steps in the above section for how to do this.
- Click Grades on the left-hand course navigation menu.
- Hover your cursor over the Name of the assignment you’d like to grade.
- Click the More Options Menu (three vertical dots) to the right of the assignment name.
- Click SpeedGrader.
- The assignment will appear on the left, and the grading and feedback panel on the right.
- Click and drag the Vertical Bar of the Grading and Feedback Panel to adjust the width of the panel.
- Review the Student’s Work.
- Click on the drop-down box labeled View Mode under Rubric & Feedback.
- Traditional Rubric View: Displays the rubric in a familiar grid format with criteria listed in rows and performance levels listed in columns.
- Horizontal Rubric View: Organizes criteria in a list with the rating level numbers displayed in a row underneath the criterion description.
- Click on each rating to view the rating level description.
- Vertical Rubric View: Organizes criteria in a list with the rating level numbers displayed vertically beneath the criterion description.
- Click on each rating to view the rating level description.
- Toggle on View Student Self-Assessment underneath the View Mode to a student’s self-assessment if self-assessment was enabled.
- You can score the rubric from the self-assessment view. The student rating appears as a dashed green outline around the rating, while the instructor rating appears as a solid green outline.
- Click on the Appropriate Rating Box for a criterion to evaluate that student.
- Optionally Type any criteria-specific feedback in the comment box below the criterion.
- Note: In Traditional View, you can provide criterion-specific feedback by clicking on the Comment Icon within the pts box.
- Repeat for each criterion.
- Note: Total points will auto-calculate. You can override this by typing a different value in the Points box under the criterion.
- Click the Submit Assessment button under the rubric.
- Note: If you are grading a discussion that uses graded checkpoints, the rubric will not auto-fill the grade. View our tutorial, Grade a Discussion in Canvas, for guidance on grading with checkpoints.
View and Organize Course Rubrics
- Click Rubrics from the left-hand course navigation menu.
- A list of all the rubrics created/used in the course will appear. You can view their total point value and number of criteria in the columns to the right of the rubric title.
- Click on the rubric title to preview the rubric.
- Click on the View Mode dropdown menu to switch rubric views.
- Click on the X in the top right corner to exit the preview.
- Click on courses and assignments under Location Used to view which assignments or discussions a rubric is being used in the current course.
- Click on an assignment link to open the assignment.
- Click Cancel to close the Locations Used pop-up window.
- Note: The pop-up window will not indicate if a rubric is being used in another course.
- Click the box to the left of the rubric title to select it.
- Click Download Selected Rubrics at the bottom right of the screen to download the selected rubrics to your computer.
- Click the three dots to the right of a rubric title, under actions, to edit, duplicate, copy, archive, or delete a rubric.
- Note: You can only delete a rubric if it is not attached to any assignments or discussions. To remove a rubric from the main list without deleting it, choose Archive.
- Click Archived at the top of the list to view all archived rubrics.
- Archived rubrics will not appear when you find rubrics to attach to new assignments, but the rubric will continue to function normally for any assignments it was previously attached to.
Have Questions?
Need additional support on this or other teaching and learning topics? Please visit us for drop-in support or try one of our self-help tutorials.
Ready to take your teaching to the next level? Opt into our Connections with CTLD newsletter!