Last updated on March 11, 2026
Breakout Rooms is a Microsoft Teams feature that allows the meeting organizer to divide participants into multiple smaller groups. Breakout Rooms can be used in recurring meetings and meetings created using the “meet now” button in the calendar.
Best practices
- Use Breakout Rooms to create small groups for discussions, synchronous group work, peer editing, and more!
- Consider using Breakout Rooms to privately provide feedback to students.
- Set up recurring meetings if you would like Rooms to carry over from meeting to meeting.
- Provide clear instructions to students about how to navigate Breakout Rooms (for example, let students know when and how they should return to the main room).
Let’s walk through it together
Download Teams Desktop Application
Microsoft only allows you to create and manage breakout rooms through the desktop app. You cannot create breakout rooms using the web browser version of Teams. Students do not need to be using the Teams desktop app to join breakout rooms, they can still join using the web browser version.
To learn how to install the MS Teams desktop app, see our tutorial Download and Install MS Teams.
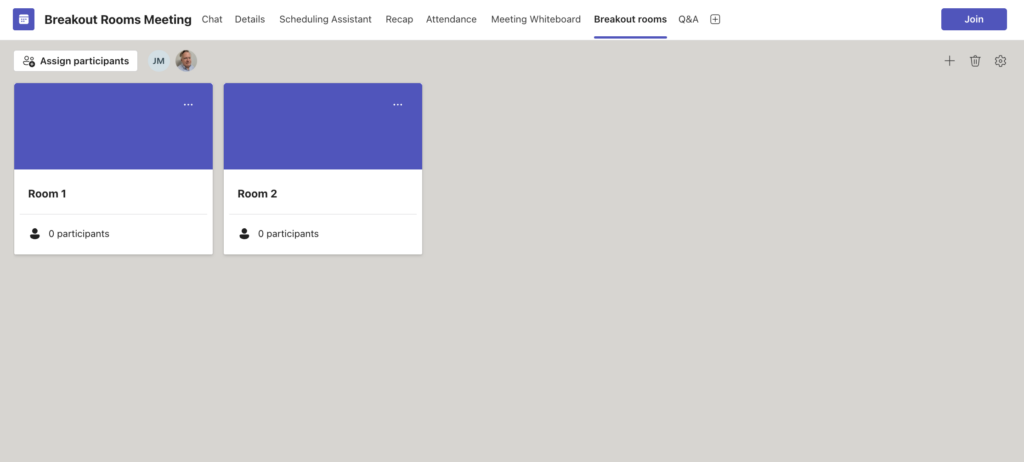
Create Breakout Rooms
Only the meeting organizer will have a breakout room icon. Breakout rooms are accessible in recurring meetings and meetings created using the “meet now” button in the calendar. You cannot access breakout rooms if you make a call in the “Calls” menu in the Teams app.
To learn how to start meetings and create recurring meetings, see our tutorials, Start a Meeting with Students in Microsoft Teams and Schedule a Recurring Meeting in Teams.
Create Breakout Rooms Ahead of Time
For scheduled meetings created in a Team or through the Calendar with required attendees, you can set your breakout teams up and assign members to specific teams before the meeting begins.
- Locate the scheduled meeting through the Teams or Calendar tab on Teams.
- Click the Meeting Title to expand the meeting settings.
- When using the calendar, click the arrow in the top right of the pop-up window to expand the meeting.
- Click Breakout Rooms from the top panel.
- Click Create Rooms.
- Enter the number of rooms you wish to create.
- Click Add rooms.
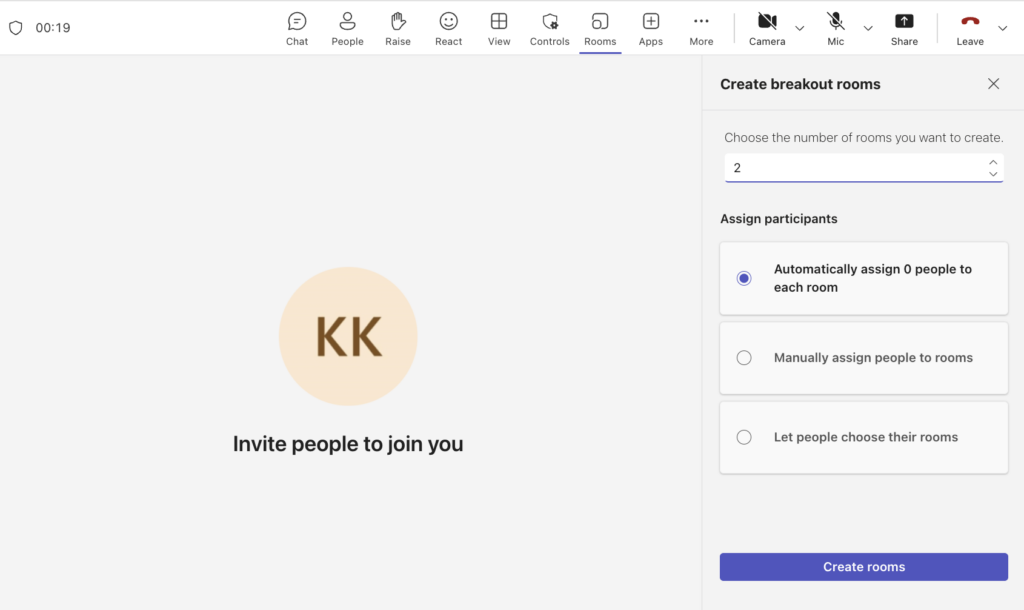
Create Breakout Rooms during the Teams Meeting
When creating breakout rooms during the meeting, you can only assign members who are currently in the meeting. All the steps for assigning participants and adjusting settings are the same when creating the rooms ahead of time vs. during the meeting.
- Start a Teams meeting using the Teams Desktop App.
- Select Rooms (Square with a circle inside it) from the toolbar at the top.
- Enter the number of rooms you wish to create in the text box that appears.
- Choose how you want to Assign participants.
- Note: See the section Assign Participants below to see what the different options are.
- Click Create Rooms.
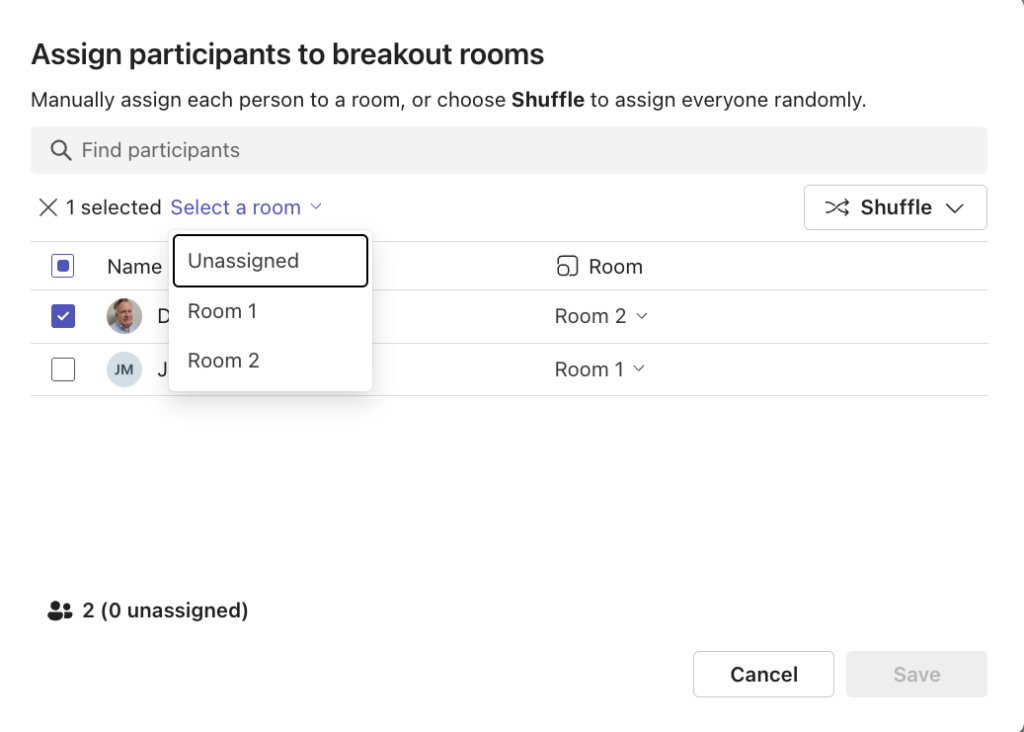
Assign Participants
You can change where participants have been assigned at any point. If you change a breakout room assignment while students are in the rooms, the participant will be moved immediately from their current room to their newly assigned room.
- Click Assign Participants.
- Choose how you want to Assign participants to breakout rooms (If creating the groups inside the meeting, you will already have completed this step).
- Automatically: Teams will randomly assign an equal number of participants to each room (if there is an odd number, one room will get an extra member). You will be able to reassign participants if desired.
- Manually: You control the how participants are assigned to different rooms.
- You will assign participants after creating the room. The section below this, Assign Participants, goes over how to do this.
- Let people choose their rooms: The meeting members can select a breakout room to enter.
- For Manual Assignment:
- Click the box next to each participant you want moved to a specific Breakout Room.
- Click Select a room under the search bar, and above the list of names.
- Select the Room you want the selected participants assigned to.
- Repeat steps 2-4 until all participants have been assigned a room.
- Alternatively, you can use the Room Dropdown menu to the right of a participant’s name to assign one member at a time to a room.
- Click Shuffle on the top right to randomly assign members to a room.
- Note: You can use the shuffle feature to randomly assign everyone to a room, or you can use it to only randomly assign participants who are currently unassigned.
- Click Save at the bottom of the pop-up window.
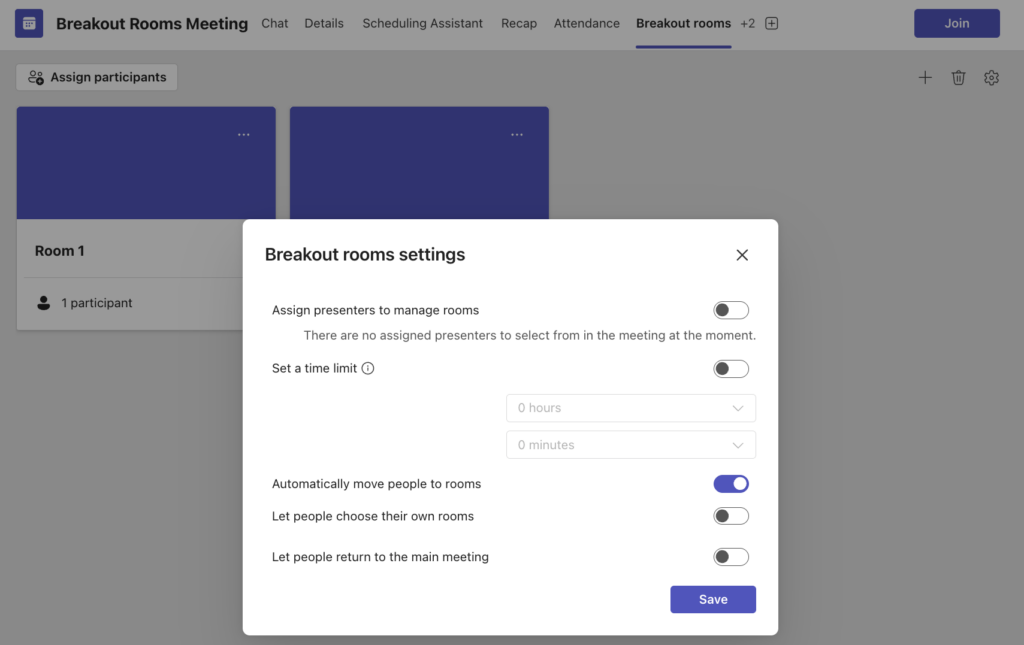
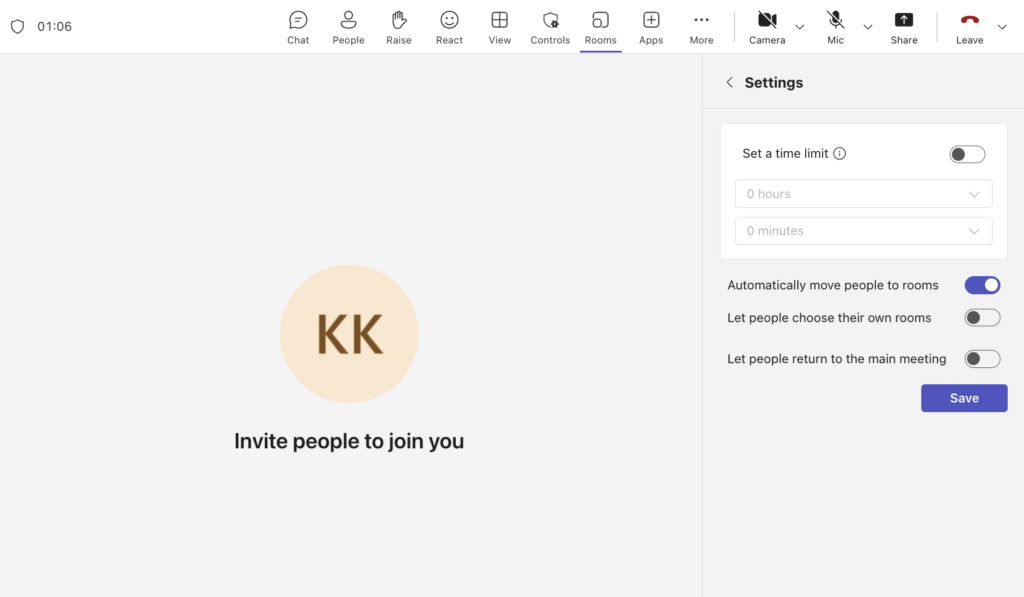
Adjust Breakout Room Settings
- Click the settings icon to the right of the list of Rooms.
- Click the toggle next to Assign presenters to manage rooms to designate presenters to specific rooms.
- To add a presenter, you will need to invite them to the meeting and change their role to Presenter in the Meeting Options.
- Click the toggle next to Set a time limit if you want to the Breakout Rooms to automatically close after a certain amount of time.
- Enter the hours and minutes into the text boxes.
- Click the toggle next to Automatically move people to rooms if you want participants to be automatically moved once the rooms are opened.
- Note: This setting is automatically turned on. If you turn it off, members will have to move to the breakout room on their own.
- Click the toggle next to Let people choose their own rooms if you want to change the assignment settings to allow members to choose which room they go to.
- Click the toggle next to Let people return to the main meeting if you want members to be able to move back and forth between their breakout room and the main meeting space.
- Click Save.
- Click the + button to the right of the Rooms names to add a new Breakout room.
- Click the three dots to the right of a room name, and select Rename to change the name of a room.
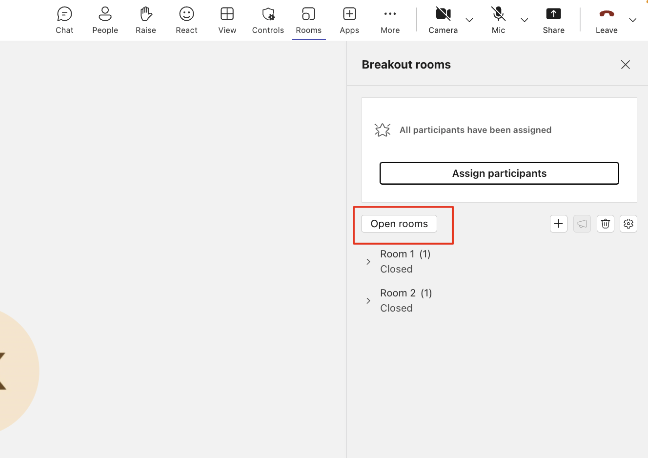
Open/Close Breakout Rooms
Rooms will automatically be closed when you first create your room. Once you have adjusted the Room settings and started the meeting you can open them to members.
- Start the Scheduled Meeting if you haven’t already.
- Click Rooms from the toolbar at the top of the Teams Meetings.
- Click Open rooms above the list of rooms to open all the rooms at once.
- Alternatively, you can open one room at a time.
- Hover your cursor over the name of the Breakout Room in the Breakout rooms panel.
- Click the three-dot icon.
- Select Open Room. The Open Button will appear.
- Note: If the Automatically remove people to rooms setting is turned off, participants will see a “join breakout room” pop-up window, and will need to select the “join room” button to join the breakout room.
- Alternatively, you can open one room at a time.
- Select Close Rooms to close all breakout rooms at once.
- You can follow the same steps at above, but select Close Room, to close one room at a time.
- Note: Close the room to bring participants back to main meeting room (this will take 10 to 30 seconds). Participants will see a “breakout room has closed” pop-up window appear, and they can select “join main room” to return right away, or they can wait, and Teams will bring them back after 30 seconds.
Join and Communicate with Breakout Rooms
Send Announcements to Students
- Click the Announcement (megaphone) icon to make an announcement to students while they’re in the breakout room.
- Type your announcement in the text box that appears.
- Click Send.
- Announcements will appear in each individual rooms chat panel.
Join a Breakout Room as the Organizer
- Hover you cursor over the Room name.
- Click the Three dots to the right of the Room name.
- Select Join from the drop-down menu.
- This will open a separate window with the breakout room. You will still be able to see the main room, but it will show you as on hold. You will need to leave the breakout room in order to talk in the main room.
- Click the Rooms icon at the top of the toolbar to switch breakout rooms.
- Click Join next to the room you want to switch to.
- Select Leave Room at the top right of the toolbar to leave the breakout room, and return to the main meeting.