Last updated on August 28, 2025
Can you imagine building a bookcase when all of the instructions are out of order? What if you had to build it with all the wrong tools? Ultimately, your bookcase would take far too much time and energy to complete. Now, imagine building a course this way. What would that look like? How much time would it take for you to put it together? What would the result look like to you and your students? How would it feel to use it? Without a well-built structure, the course may lack coherence, engagement, and the ability to effectively deliver information.
Thankfully, Canvas has a built-in tool that can help us organize our course as we build it: modules. Using our advanced module-building techniques, you can create well-structured modules with content and design that facilitate effective learning experiences in less time and effort.
These advanced instructional design techniques include organizing the course modules in a clear and logical manner, breaking the content into smaller sections, using a consistent structure, and providing guidance for learners to give them a roadmap to follow. In addition, you can use a template that will provide you with a basic structure to build upon! Let’s get building.
Contents
Best Practices
When should I use this?
- When designing a new online course, building well-structured modules is essential. It will help students stay on track and achieve learning goals since online courses lack the face-to-face interaction of traditional classes.
- When turning an in-person class into an online one, you don’t simply make the course available online. It includes implementing new methods and techniques to build a successful online version of the course.
- When designing a hybrid or blended class, building well-organized online modules is important to supplement and enhance learning in class.
When should I set this up?
- Building modules should happen during the course development process before the semester begins. After setting your course learning objectives and gathering all the learning content (materials, activities, tools, assessments), it’s time to build high-quality course modules.
Why should I use this?
- A well-organized course helps keep your students on track and enhances opportunities for achieving better learning outcomes.
- It provides consistency and uniformity to your course which helps learners navigate the course content and monitor their progress.
- It reduces work time and effort. When building your course, you don’t have to start from scratch, you can use a template, such as the latest MSUD Blueprint, and adjust it according to your learning objectives.
Let’s walk through it together
Directions
Before building your modules:
- Set clear learning objectives for each module: You should identify the specific skills and knowledge that you want your students to learn. These will serve as the foundation for your modules and will help you determine the content and activities that should be included.
- Gather and organize your content: Depending on the type of courses you are creating, this might include readings, lectures, videos, quizzes, or other types of materials. Make sure to use a variety of learning activities and provide opportunities for practice, application, and feedback.
Advanced Module Building Methods:
Once you have identified the learning objectives and gathered the content of your course, it is time to build your modules. Here are some important methods to consider as you build out your modules:
Consider the flow of the course:
Think about the logical progression of the material and how each module builds upon the previous one. You may want to start with more foundational concepts and gradually introduce more advanced material as the course progresses. You can start with an overview of the modules’ objectives and introduce the basic concepts then progress through the content in a logical sequence to cover more advanced concepts. In each module, you should build on the information presented in previous modules and prepare learners for more advanced materials that will be covered later in the course.
Content Chunking:
People learn better when information is segmented into sections. Content chunking is a critical step in the process of building an online course. Building a successful course depends greatly on how well the content has been divided into smaller, manageable pieces. For example, you can break down the course content into weekly/bi-weekly modules, each covering a specific topic, then chunk the content of each module into logical segments. This makes it easier for learners to focus on one topic at a time and understand how it relates to the overall course.
Primers:
Another important aspect of organizing the course modules is providing “Primers”. A primer is a brief introduction or overview of a topic that is designed to provide basic knowledge or understanding. There are many ways to incorporate primers into modules. A primer might be used as a standalone lesson at the beginning of a module to provide an overview of the material that will be covered. Also, a primer might be used throughout a module to introduce new concepts or provide context for other activities.
Regardless of how it is used, a good primer should be clear, concise, and engaging. It should provide enough information to give students a basic understanding of the topic without overwhelming them with too many details. It can also include any relevant background information or context that students need to know to fully understand the material that will be covered in the module.
Next Steps:
Including “Next steps” at the end of each module will provide learners with clear guidance on what they should be doing next, so they can stay on track and make progress in the course. The next steps in a module should be clearly defined and aligned with the learning objectives of the module. The next steps might include moving on to the next module in the course or completing additional activities or assessments to reinforce the material covered in the module.
Consistency:
To help students understand what to expect and make it easier for them to follow along, consider using a consistent structure for each module. For example, each module might include the following sections: an introduction, main content, summary, discussion, and assessments.
Templates and blueprints
Using templates can be a helpful way to streamline the process of building modules for a course. A template is a pre-designed format or structure that can be used as a starting point for creating a module. Here are some benefits of using templates for module building:
- Saves time: Using a template can save you time and effort by providing a basic structure that you can build upon. You can also reuse the template to build other modules or courses.
- Ensures consistency: Templates can help to ensure consistency in the design and structure of your modules, which can make them easier for students to follow and understand.
- Provides a starting point: If you are new to building modules or are not sure where to start, a template can provide a helpful starting point and give you some ideas for how to structure your material.
- Increases flexibility: A template provides you with basic components that can be easily modified to fit your course’s needs. It also can be adjusted to work for a variety of courses.
MSU Blueprint:
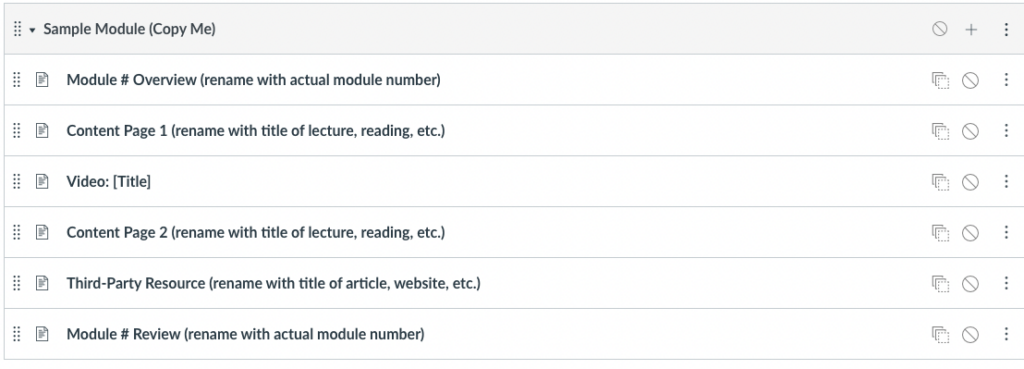
MSU has a blueprint that comes with each course shell in Canvas. This blueprint includes a “Sample Module” which you could simply customize to fit the specific goals of your course and module. If you decided to use the sample module, keep in mind your learning objectives and the needs of your students as you customize it to ensure building an effective and engaging learning experience.

Example of customizing the sample module for the course SED 3675: Transition Planning and Instruction
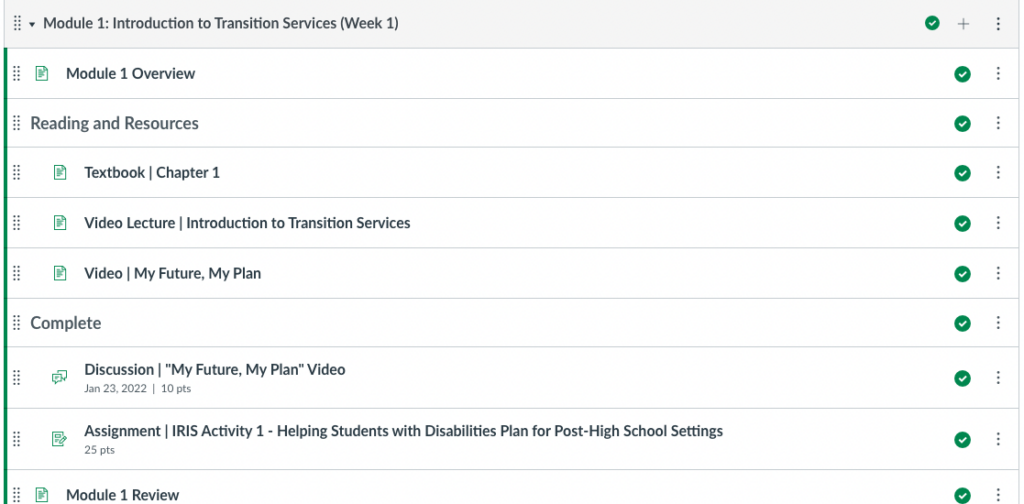
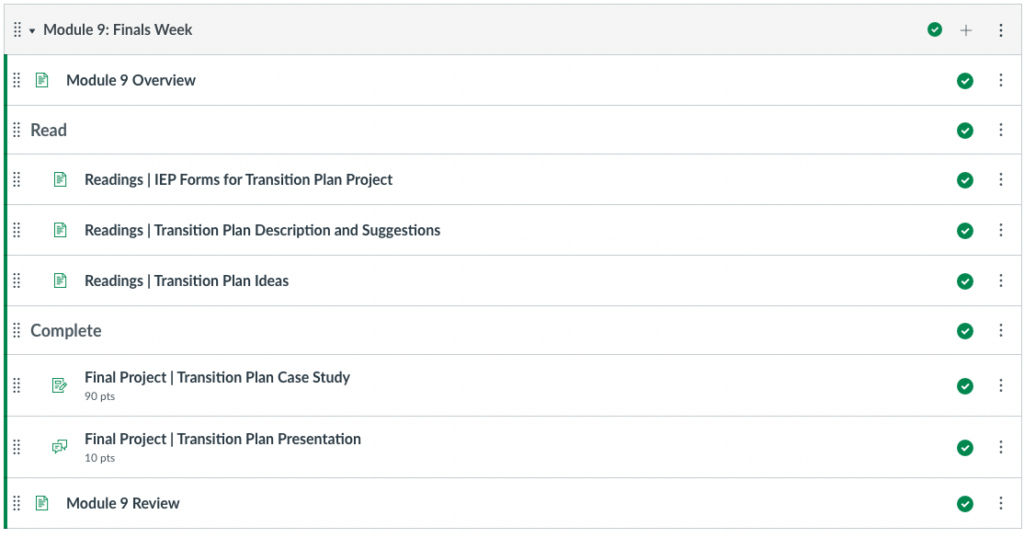
Lastly, let’s review an effective example of customizing the sample module. In this example, the instructor and the ID team member used the sample modules as a starting point to build the modules of the online course SED 3675: Transition Planning and Instruction. Here are some main things you can notice in this example:


Each module starts with the Overview page to introduce the topic covered in the module.
Each of the modules ends with a Review page which provides learners with a summary of the key points covered.
All the content of the module was chunked into two main sections; “Read & Resources” and “Complete”. This way of dividing the content can really vary depending on your course materials and the way you would like to organize them to support your learning objectives.
The “Read & Resources” section in this course includes all the content about the module’s topic that learners need to go over (assigned readings from a textbook, video lectures, third-party videos, websites, etc.)
The “Complete” section includes all the activities and assessments the learners need to finish in order to complete the module.
The course follows a logical structure, it started with the introduction module and gradually introduces more advanced content as the course progress till it ends with the final module.
Each page in the course ends with a clear “Next Step” to tell learners what they need to do next to stay on track.
All the modules in this course follow a main consistent layout with some flexibility. This consistent design makes it much easier for learners to navigate the course.
This was just an example of how to customize the sample module. Each course is different depending on its objectives, disciplines, or methodologies. As a result, if you decided on using the sample module, there is no best way how to customize it. For more details on how to edit the sample module, please refer to the Blueprint: Sample Module Overview tutorial. And for information on how to modify modules, please refer to the Add, Move, Edit, & Delete Modules tutorial.